FREE In-store Pick Up. Delivery Rates vary (determined at checkout).

How to Tame Your Monstera

How to Tame Your Monstera

Taming Your Monstera

Do you have a Monstera deliciosa that’s living up to its name – monstrous? We recently got a listener question from Jodi, who wrote in saying her beloved Monstera is basically taking over her living room. We’ve all watched our houseplants grow from cute little babies to magnificent giants, but what do you do when “magnificent” starts feeling a bit like “menace”?

Prune Like a Pro: Taming Your Monstera

The key to keeping your Monstera happy and at a manageable size is strategic pruning. Think of it as giving your plant a stylish haircut, not a buzz cut!

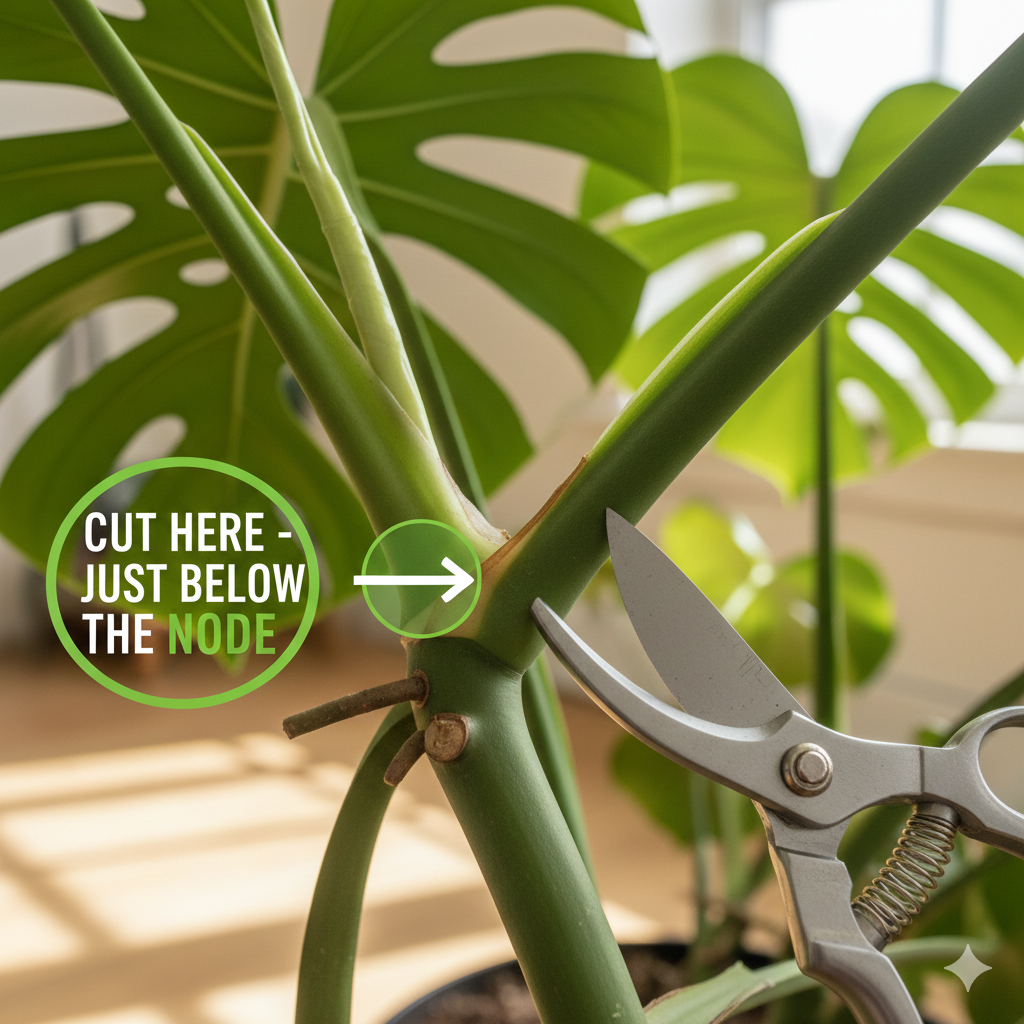
The golden rule for pruning is to always cut just below a node. It’s that little bump on the stem where a leaf or an aerial root emerges. This is where new growth will sprout from, so cutting here ensures your plant can recover and branch out. Use sharp, clean shears to make a precise cut.

Pro Tip: Never cut more than one-third of your plant at a time. This helps prevent your Monstera from going into shock, which can stress it out and hinder new growth. It’s better to do a few smaller pruning sessions over time than one drastic chop.

And speaking of leaves in inconvenient spots – sometimes you have that one gorgeous leaf that’s just poking out in all the wrong directions. Go ahead and snip it off! While a single leaf without a node won’t sprout roots in water, it makes a stunning, long-lasting addition to a floral arrangement. Instant tropical vibes for your home, no commitment required!

The Wild & Wonderful World of Aerial Roots

Okay, let’s talk about those fascinating, often quirky, aerial roots that your Monstera sends out. They look a bit like long, brown tendrils. These aren’t just for show – they’re super important! Aerial roots help Monstera climb trees in the jungle, anchoring them and allowing them to seek out light. They also absorb moisture and nutrients from the air.

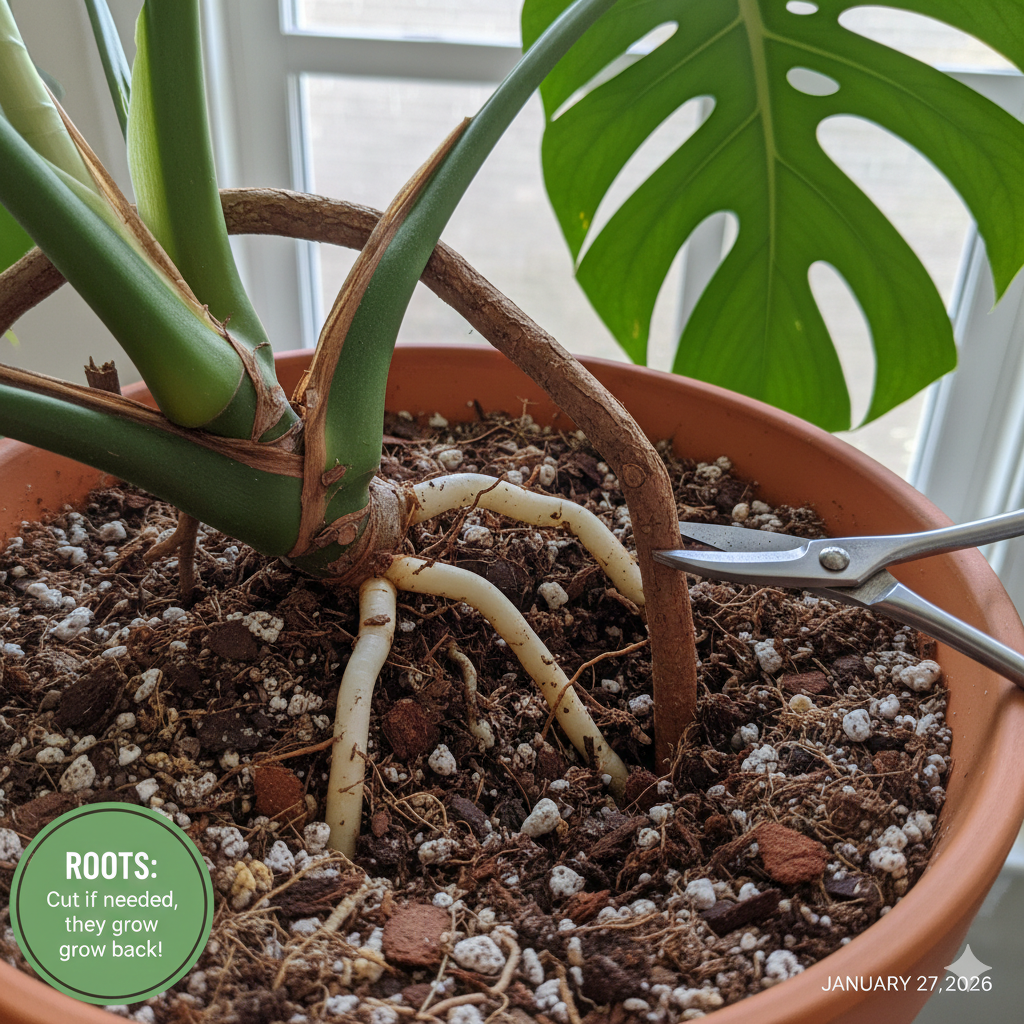
Can you cut them off? Generally, yes, it’s okay to snip off an aerial root if it’s really bothering you or growing in an awkward direction. Just make sure you use clean, sharp snips to avoid damaging the plant.

Your Monstera will be just fine without them.

Propagate Like a Boss: Make More Monsteras!

Now for the fun part: turning those pruned pieces into brand new plants!

Once you’ve made your cuts, you’ll have stem sections with at least one node and ideally a leaf or two. Before you pop them into water or soil, it’s crucial to let the cut end “callous over.” This just means allowing the cut to dry out and form a protective seal, which usually takes a few hours or even overnight. After your cutting has calloused, you can place it in a jar of water, making sure the node is submerged. Change the water every few days, and soon enough, you’ll see roots start to emerge from that node. Once the roots are a few inches long, your new Monstera baby is ready to be potted in soil.

Translate »

Calcium Nitrate:

Mix Ratio: Apply ¼ teaspoon per 2 litres once a week. I full scoop makes 24 litres or 6 gallons.

Recommended preventing blossom end rot and calcium deficiency in tomatoes, peppers, cucumbers, pumpkins, zucchinis, and cannabis. It is also highly beneficial for all leafy greens and cruciferous plants (cabbage, Brussel sprouts, broccoli etc.).

Caution: Do not exceed the recommended amount. Keep out of reach of children and pets.

Iron Chelate

Mix Ratio: Soil drench – apply ¼ teaspoon (1gram) /per 1 Litre of water once every 2 weeks. A full scoop makes 12 litres or 3 gallons.

Mix ratio: Foliar spray - apply ¼ teaspoon (1gram) /per 4 Litres of water once every 4 weeks. A full scoop makes 24 litres or 6 gallons.

Recommended for correcting iron deficiency in a variety of plants grown in high pH soil. Iron deficiency is diagnosed by the yellowing or pale colour of the plant leaves, especially in young growth.

Caution: Do not exceed the recommended amount. Keep out of reach of children and pets.

High Drainage

Moisten Thoroughly before use: (optional) Peat moss can be water-repellent. Before use, thoroughly wet the soil.

Potting:

Use pots with drainage holes to prevent root rot.

Fill the pot with the moistened soil, leaving enough space for the plant's root ball.

Gently place the plant in the pot and fill in around it with more soil.

Firm the soil gently.

Watering:

This is crucial! Water frequently, especially during hot weather.

Check the soil moisture regularly by sticking your finger into the soil.

Water deeply when the top inch of soil feels dry.

Fertilizing:

Since peat moss is low in nutrients, fertilize regularly with a balanced liquid fertilizer.

Consider Amendments:

For plants that prefer more moisture retention, you can add a small amount of coco coir or vermiculite to the mix.

Important Notes:

Overwatering: While frequent watering is necessary, avoid overwatering, which can lead to root rot.

Plant Selection: This type of soil is well-suited for seed starting as well as plants that prefer well-drained conditions, such as cacti, cannabis, succulents, and some tropical plants.

Adjustments: You may need to adjust your watering frequency based on the specific plant and environmental conditions (temperature, humidity, sunlight).

Alberta Blend

Moisten the Peat Moss before use: (optional) Peat moss can be hydrophobic (water-repellent) when dry. Before using it, thoroughly moisten it. You can do this by placing it in a container and adding water, then squeezing out any excess.

Mixing: (optional) Our Private Label Alberta Blend comes ready to use, expertly formulated for your plants, either indoors or outdoors.

If you're using this mix as your own base, combine it with worm castings, volcanic dust, vermiculite, etc. to improve nutrition, drainage and/or aeration.

Potting:

When potting your plants, ensure that the pot has drainage holes.

Fill the pot with the moistened potting mix, leaving enough space for the plant's root ball.

Gently place the plant in the pot and fill in around it with more potting mix.

Lightly firm the soil around the plant leaving ½ inch to an inch of space at the top for watering.

Watering:

Because peat moss retains water, be careful not to overwater.

Allow the top layer of soil to dry out slightly before watering again.

Fertilizing:

Since peat moss is nutrient-poor, you'll need to provide your plants with regular fertilization.

Use the correct fertilizer according to the plant's needs.

20-20-20 Houseplant Complete

Mix Ratio: For all houseplants apply ¼ teaspoon (1gram) /per 1 Litre of water once a week once every week. A full scoop makes 12 litres or 3 gallons.

It is highly recommended to start your houseplants on a fertilizer regime, but only while they are actively growing. Houseplants tend to have a period of dormancy (normally winter, however poinsettias, Xmas cacti etc. are exceptions to this rule) and whilst dormant they should not be fertilized.

Caution: Do not exceed the recommended amount. Keep out of reach of children and pets.

22-6-15 Plus Herb and Leafy Vegetable

Mix Ratio: For all herbaceous and leafy vegetable plants apply ¼ teaspoon (1gram) /per 1 Litre of water once a week. A full scoop makes 12 litres or 3 gallons.

This fertilizer is ideal for all leafy vegetables and for herbs. This product can be used year-round if you grow herbs indoors.

Caution: Do not exceed the recommended amount. Keep out of reach of children and pets.

20-12-28 Tomato and Fruiting Vegetable

Mix Ratio: For all fruiting vegetable plants apply ¼ teaspoon (1gram) /per 1 Litre of water once a week. A full scoop makes 12 litres or 3 gallons.

Use this fertilizer on planting day and push right through until the plant either stops producing or reaches the end of season. In the case of transplanted seedlings this fertilizer should be used after the 2 feedings of Js - Jump-Start & Transplant.

Caution: Do not exceed the recommended amount. Keep out of reach of children and pets.

10-52-10 Jump-Start & Transplant

Mix Ratio: For outdoor summer plants apply ¼ teaspoon (1gram) /per 1 Litre of water. Normally two applications, one at the time of transplanting, the second application can be done one week later from the initial fertilizing. A full scoop makes 12 litres or 3 gallons.

Mix Ratio: For seed starting - apply ¼ teaspoon (1gram) /per 1 Litre of water. Do not over water seedlings, feed every 2 weeks until transplanted outside. Feed them at the time of transplanting outdoors, then one more feeding a week later. After that start using the correct fertilizer for type of plant. A full scoop makes 12 litres or 3 gallons.

 e.g. Vt Vegetable: Tomato and Fruiting for tomatoes, F3 Flower flower flower for bedding out/annual plants.

Caution: Do not exceed the recommended amount. Keep out of reach of children and pets.

4-5-28 Perennial Complete

Mix Ratio: All perennials (in warm seasons) apply ¼ teaspoon (1gram) /per 1 Litre of water every 2 weeks from spring to late summer. A full scoop makes 12 litres or 3 gallons.

This formula is professionally blended for all your perennials. For existing perennials, we recommend starting to fertilize when you see active growth (i.e. new shoots etc.). For new perennials we recommend that you start fertilizing at time of planting and go through to mid August.

Caution: Do not exceed the recommended amount. Keep out of reach of children and pets.

28-14-14 Plus Trees and Shrubs - Fruit and Flower

Mix Ratio: Trees and/or shrubs (in warm seasons) apply ¼ teaspoon (1gram) /per 1 Litre of water per week. A full scoop makes 12 litres or 3 gallons.

This formula is professionally blended for all your fruiting and flowering trees and shrubs.

For existing trees, we recommend starting to fertilize when you see active growth (i.e. bud break, new shoots etc.).

For new trees we recommend that you start fertilizing at time of planting and go through to mid August.

Caution: Do not exceed the recommended amount. Keep out of reach of children and pets.

14-7-21 Tree and Shrub Leaf & Needle

Mix Ratio: Trees and/or shrubs (in warm seasons) apply ¼ teaspoon (1gram) /per 1 Litre of water every 2 weeks. A full scoop makes 12 litres or 3 gallons.

This formula is professionally blended for all your evergreen/coniferous and deciduous trees and shrubs.

For existing trees, we recommend starting to fertilize when you see active growth (i.e. bud break, new shoots etc.).

For new trees we recommend that you start fertilizing at time of planting and go through to mid August.

Caution: Do not exceed the recommended amount. Keep out of reach of children and pets.

15-10-30 Flower, Flower, Flower

Mix Ratio: Outdoor plants (in warm seasons) apply ¼ teaspoon (1gram) /per 1 Litre of water twice a week. A full scoop makes 12 litres or 3 gallons.

This formula is professionally blended for all your annual plants. We recommend starting to fertilize at time of planting outdoors and go through to first frost.

Caution: Do not exceed the recommended amount. Keep out of reach of children and pets.